Mortar tensile testing machine body profile:
1. The test machine consists of the base, the box column, the chuck, the screw, the track, the electronic force measuring system, the displacement measuring system and other components.
2. The mechanical loading system consists of a reduction box and a lead screw in the lower case.
3. The chuck is composed of main parts such as bracket, pressing plate, pillar, rolling piece and spring. The upper chuck is connected with the measuring force body, and the test piece is clamped upward to realize the force transmission.
The mortar tensile testing machine is installed. The whole test box is shipped from the factory. The base should be pre-installed in the installation. The height should be matched with the machine. It is convenient for operation and can also be customized to the factory. The machine setting should find the level, otherwise it will affect the pull value. There are four foot bolts on the bottom of the machine to adjust the level, and the ground wire can be used.
Commissioning and use of mortar tensile testing machine:
1, the chuck position adjustment a] press the up button on the panel, and the status indicator on the panel is red, the corresponding speed gear indicator starts to flash, the status display position on the LCD screen: rise, and the force value and shift are displayed in real time. Value, if the force value or displacement of the zui large limit value, automatically stop, while the LCD status position shows full load or limit.
b] Press the down button on the panel, and the status indicator on the panel will be green, the corresponding speed gear indicator will start to flash, the status display position on the LCD will display [Down], and the force value and shift value will be displayed in real time.
c] Press the stop button on the panel, and the status indicator on the panel will be off. The corresponding speed gear indicator will stop flashing and stay on, and the LCD status display will stop.
2, speed adjustment Press the corresponding seven speed buttons to select one to complete the speed adjustment, the corresponding speed indicator will light, be careful not to press multiple speed buttons at the same time.
4. How to use First press the clear button on the panel, the system will automatically perform the tension and displacement zero calibration, then press the start button, and the status indicator on the panel will light red, and the corresponding speed gear indicator will start flashing. The LCD screen displays the force value and the position of the large value of zui. If the predetermined stop condition is met, the system automatically stops, the LCD screen automatically displays the position, breaks, and maintains the large value of the Zui and the displacement Zui, waiting for the system after 2s, starting Enter, at the same time, the status indicator on the panel lights up red, the corresponding speed gear indicator light starts to flash. After returning to zero position, the system will automatically stop, the status indicator on the panel will go out, the corresponding speed gear indicator will stop flashing and stay on, LCD The on-screen status display position display is valid. Press the start button and press the stop button to automatically stop the system. At the same time, invalid data is generated and the corresponding indication is given. If the tension and displacement reach the large limit value of zui during the test, The system also automatically stops, and the LCD status position shows full load or limit.
Manual parking and automatic parking mode adjustment (please note: do not adjust easily)
Press the setup button, the LCD will display the input password. The password is 22. Press 2 times to clear and then press 2 times. The sample password position is displayed. 22. Input is complete. Press the setup button and press the print button 6 times to display the carriage return status. Press the sample. For manual return, press the clear key to enter the auto return, press the set key to exit, the adjustment is completed. Note: press the sample key when the auto return is pressed, otherwise the value will not be maintained after pressing the stop key.
The system status display position display is valid. Press the panel sample button, the system automatically stores the current test data, and the number of samples is increased by 1. If the sample button is pressed in other states, the LCD screen displays the mean value, and the system displays the current test process. The average value of all the samples. If you press the button button again, the status display on the LCD will display the browse. At the same time, the storage of the sample will be browsed from back to front. After browsing the completed samples, the system will display the average again and prepare again. Samples are viewed from front to back. Press other strong keys to exit browsing.
After the test is completed, clean the surface and cover the dust cover.
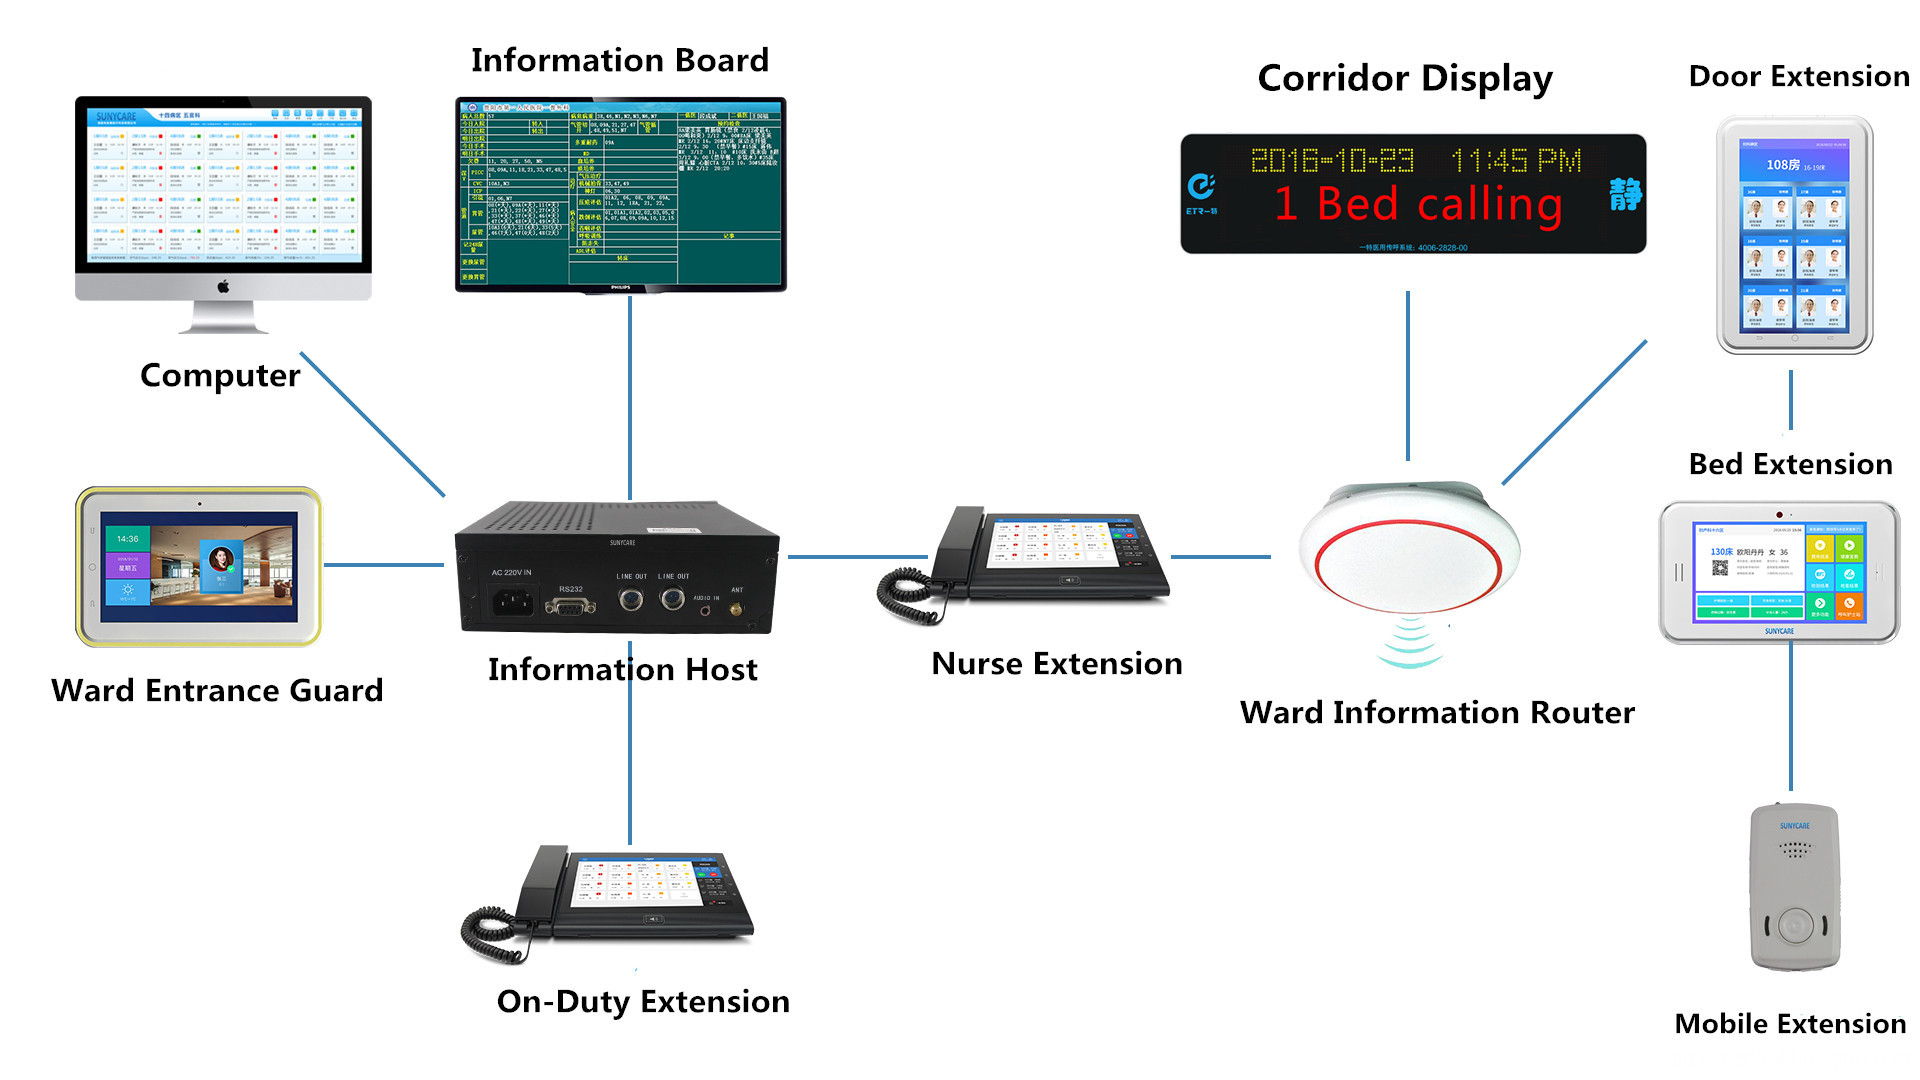
IOT Smart Ward Nursing System
Smart Ward Nursing System is an indispensable important part in hospital digitization construction, which not only provides the powerful communication among doctors, nurse and patients, but also creatively offers the new functions of voice reminding, information issuing, information collection, multimode connecting data and upload automatically with all testing device in the ward, information process and etc., stretched hospital information system (HIS) to wards. This system has truly achieved a leap of nursing quality besides the greatly decrease of work intensity of nursing staff.

Iot Smart Ward Nursing System,Ward Calling System,Wired Ward Calling System,Smart Wired Ward Calling System
Hunan Eter Medical Co., Ltd. , https://www.eter-tech.com