Foresight review
In the last issue of this series on the sharing of electronic balance level adjustment, Xiao Bian mainly elaborated on the necessity, principle and adjustment method of level adjustment, especially in the easy-to-understand explanation. The rules and techniques of adjustment have summarized the detailed rules for everyone. I believe that the hand-practice experience of Xiaobian should be able to help the actual operation of everyone. The topic of level adjustment has come to an end. In this issue, the small series will be moved to the balance of the most important and most important part of the preparation work of the balance - calibration, then what are the points of concern in the calibration of the balance?
The old driver is also inevitably confused with the subtle concept
As early as in the middle school physics textbook, we learned the weight of the object G = mg (m is the mass of the object, g is the acceleration of gravity), for the same object, regardless of its position placed on the earth, its quality It will not change. However, the value of the gravitational acceleration g is slightly different in different parts of the earth, so the weight of the same object is different in different places. The electronic balance measures the weight of the object by the principle that the electromagnetic force is balanced with the gravity of the measured object, and the internal program calculates and displays the mass of the object, which is different from the weighing principle of the tray balance, so It will appear that the same electronic balance weighing the same object in different places will show different quality results. In addition, environmental factors such as temperature and humidity can also affect the sensor of the electronic balance, resulting in errors in weighing results.
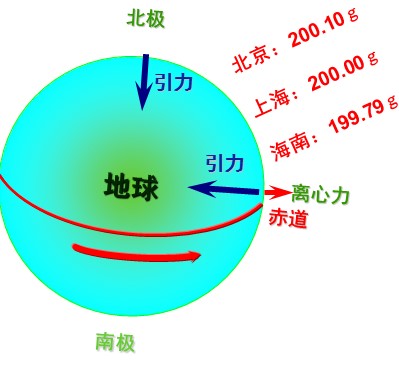
In order to avoid the adverse effects of uncertainties, it is necessary to calibrate before using the electronic balance and perform regular calibration during the life cycle, especially in applications where the accuracy of the symmetry results is accurate and accurate. Calibration is a set of weighing activities to detect the measurement performance of the balance, including the analysis of errors and uncertainties. As a good weighing habit, calibration can effectively guarantee the reliability of weighing. Through calibration, it is possible to detect the performance of the balance, avoid material waste, rework, product recall after transition use, and regular calibration and routine testing are the best ways to reduce the associated risks.
However, there is a subtle difference in the meaning of the "correction" of the word difference. Adjustment, also known as calibration, is a set of operations performed in a measurement system that provides a prescribed indication consistent with a given value of the quantity to be measured. Before the balance is put into use, after working for a period of time, or after changing the position, it needs to be corrected to eliminate the weighing error caused by gravity acceleration and environmental interference factors. Usually, a high-precision standard weight is required to perform range calibration on the balance. In summary, through regular calibration and calibration, the weighing error of the balance can be reduced, and the measurement performance of the balance is fully grasped to ensure that the weighing result meets the requirements of the experiment and production.
In daily work, it is often easier to confuse the concepts of “calibration†and “correctionâ€. For this subtle difference in strict sense, it is customary to have a certain degree of versatility, and the correction can also be considered as a narrow calibration. The rest of this article is mainly based on this discussion.
Approaching the most sophisticated calibration
A. About the weight of the knowledge
When it comes to calibration, it is the weight that plays a vital role. The weight is a kind of physical measuring tool with certain physical characteristics and measurement characteristics and can reproduce the quality value. It has very different indexes on its shape, size, material, surface condition, density, magnetic property, quality nominal value and maximum allowable error. strict regulations. As the most common and important tool for calibration and calibration, the International Organization of Legal Metrology (OIML) has a clear classification of weights, which are divided into 9 levels: E1, E2, F1, F2, M1, M1. –2, M2, M2–3, M3, etc. are classified according to the uncertainty, and the weight has a correction value; the level is divided according to the indication error, and the level weight has no correction value, as long as the indication error is here. All within the scope are considered qualified. Among the many indicators of weights, the highest correlation with calibration is the maximum allowable error (MPE). The relevant international regulations have clear provisions for the MPE of each grade. The following table is the standard used for electronic balances. Description of the weighing weight MPE (error value in milligrams):
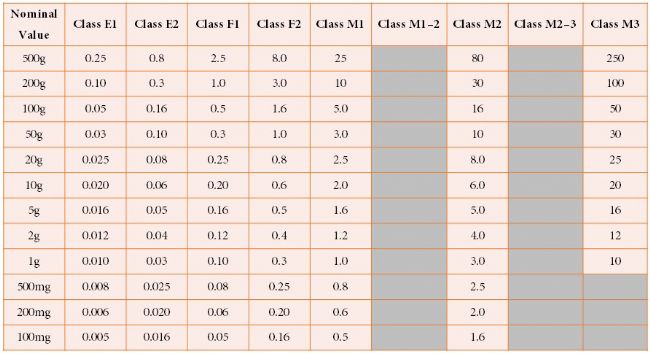
As can be seen from the above figure, in the case of the same quality nominal value, the size of the MPE is inversely proportional to the level of the weight level; in the case of the same weight level, the size of the MPE is proportional to the size of the mass nominal value. .
At the same time, in the relevant provisions of the national standard, the electronic balance is divided into four levels of accuracy according to the verification index value e and the verification index number n, from high to low, the order of special I, high II, medium III, ordinary IV is accurate. Degree level. Combined with the trend of the weight MPE, the higher the accuracy of the balance needs to be calibrated with a higher level of weight, so that the data of the calibration balance is more accurate. For example, one hundred thousandth and one ten thousandth of a balance should be calibrated with an E-class series weight, one thousandth of a balance should be calibrated with an E2 or F1 weight, and so on.
B. Classification of calibration
From the purpose of calibration, it is divided into “range calibration†and “linear calibrationâ€. In the manufacturing and maintenance process, it is necessary to combine two calibration methods, and the daily use process generally only needs to be range calibration.
The span calibration is mainly to assign a balance to the balance in the current weighing environment. By weighing a weight of a known mass, the proportional relationship between the actual value and the displayed value is obtained as a coefficient for calculating the future display value. It is the effect of eliminating the effects of symmetry of different latitudes and altitudes, the effect of the symmetrical quantity of ambient temperature changes, and the error accumulated after the balance is used for a period of time. Usually, the range calibration adopts a relatively simple two-point calibration method. The first point is zero point, and the second point is the maximum range of the balance. It is easy to operate daily, and the balance can be quickly adapted to the current weighing environment to ensure the entire range. Accurate weighing within the range is a common calibration method for laboratory staff.
Linear calibration is mainly to eliminate the error by linearizing the weighing results of multiple points in the full-scale range, so that the ratio of the display weighing result to the reference quality is nearly the same. Generally, the electronic balance is set at 3 points, namely zero point, half scale and maximum range. After the balance is linearly calibrated, the full-scale linearity error usually shows an S-type, that is, the error is small at three calibration points of zero, half-scale, and full-scale, and the error is relatively large at 1/4, 3/4 full-scale. For better linearity, multiple corrections can be taken, such as the more scientific 5-point linear method used in the manufacturing process. Of course, the mathematical correction is only auxiliary, and the indication error of the balance depends on its own real performance.
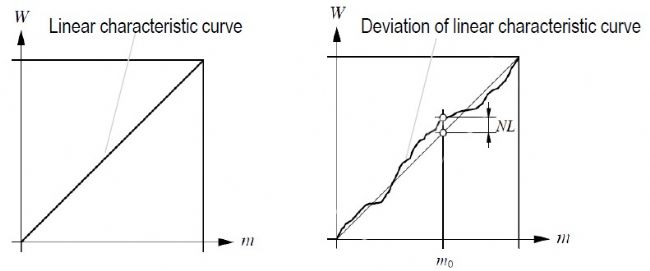
The above two figures describe the linear relationship between the actual load m and the weighing value W. The straight line on the left is the ideal linear characteristic curve, and the right is the contrast between the measured curve (non-linear curve) and the ideal line. Nonlinearity refers to a relationship that is not proportional and not linear, and the first derivative of the function is not constant. The NL at m 0 is the nonlinear error between the weighing indicator and the actual load. In the weighing specification of the balance, the linearity is usually expressed as the maximum error value (in grams) in the test of increasing load. The smaller the error value, the higher the linearity and the more accurate the weighing.
Since linear calibration uses segmentation error comparison, the more nodes, the smaller the nonlinear error, and the closer the measured curve is to the ideal fit line, so linear calibration is to ensure that each weighing range is maximized. Accurate, so there are more stringent requirements for calibration conditions. Usually, the linear calibration process is automatically performed by the robot in a constant temperature and humidity environment. When calibrating, you need to prepare a corresponding number of weights. Non-professionals are strictly prohibited to operate privately. Otherwise, the original program cannot be restored, which affects the normal use of the balance.
In summary, range calibration and linear calibration each have their own characteristics and uses, and the combination of the two can effectively improve the quality of calibration.
From the method of calibration, it is divided into internal school and external school. An internal school is a calibration that is performed using a calibration weight installed inside an electronic balance and following an internal standard procedure. To calibrate, simply press the calibration button and the motor will drive a lifting device with a built-in weight to load the balance to implement and complete the calibration.
An external school is a method of correcting the error of the balance itself by using an external weight. In advance, it is necessary to check whether the external weight has passed the verification, and during the validity period of the verification, it is mainly to ensure that the weight meets the relevant standards for the control of the physical measuring instrument. To start the calibration, first press the calibration button, and then manually put the weight of the specified range onto the electronic balance pan to complete the calibration process.
Usually, the external weight may be adversely affected by natural factors such as dust, daily wear and acid and alkali corrosion. Therefore, in order to ensure the accuracy of the measurement work, the external weight also needs to be calibrated regularly, often paying for the province (city) The level measurement institute does the test; coupled with the possibility of artificially getting the wrong weight, the requirements of the external school balance for human operation will be more demanding. Balances with built-in weights generally do not occur and can be corrected by modifying the calibration program parameters of the balance. In summary, the internal school can effectively avoid the error caused by uncertain factors, which is a more cost-effective method than the external school.
Whether it is an internal school or an external school, the electronic balance must be warmed up before use (one-tenth of a balance needs at least 1 hour of warm-up), followed by level adjustment, and then you can start calibration (the following steps) For the traditional calibration method, there will be some differences between the balances of different brands and models):
First, ensure that there are no weighing objects on the weighing pan that should be displayed in a stable position to zero.
Second, press the “CAL†button to activate the calibration function of the electronic balance.
Third, when the display of the internal calibration balance changes from "C" to zero, the calibration is over; the display of the external calibration balance first displays the mass value of the weight to be prepared, and secondly corresponds to the balance accuracy level. The standard weight of the grade is placed on the weighing pan of the balance. When the screen display value is unchanged, remove the weight and the screen displays “Done†to indicate that the calibration has been completed.
Fourth, if an error occurs during calibration, the electronic balance display will show “Err†or “Time out†and should be recalibrated.
The revolution in calibration - Ohaus AutoCalTM fully automatic calibration technology
How have you seen the detailed introduction above, have you found that calibration is a fairly technical knowledge? In fact, with the rapid development of weighing technology, the calibration methods are becoming more and more humanized. If you're still struggling with the cumbersome human handling of traditional calibration methods, take a look at the Ohaus AutoCalTM fully automatic calibration technology that brings a new revolution to the calibration of your balance!
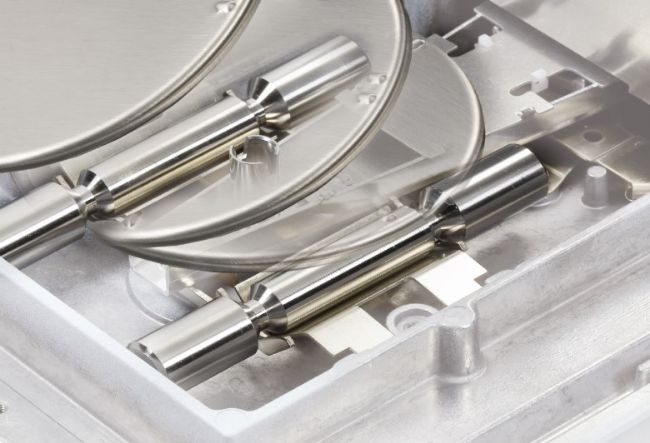
Ohaus AutoCalTM is a professional fully automatic calibration technology for ambient temperature drift and time triggering. It has been completely improved on the basis of the traditional internal school, with temperature drift values ​​exceeding ±1.5 ° C or between 3 and 11 hours ( When the user can customize the internal calibration time), the balance calibration automatically triggers, avoiding the potential factors that cause the balance to be inaccurate due to improper timing calibration or improper manual calibration.
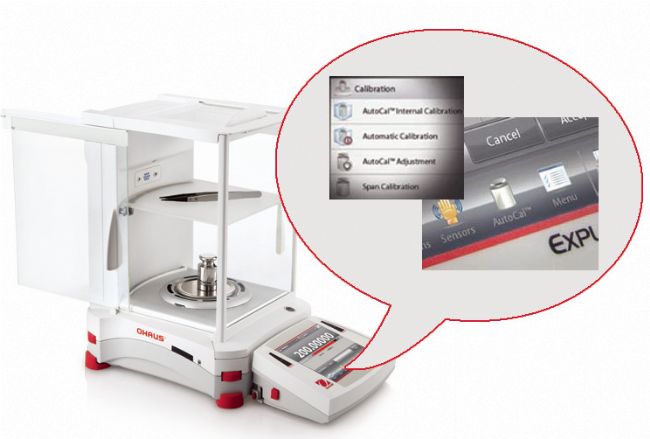
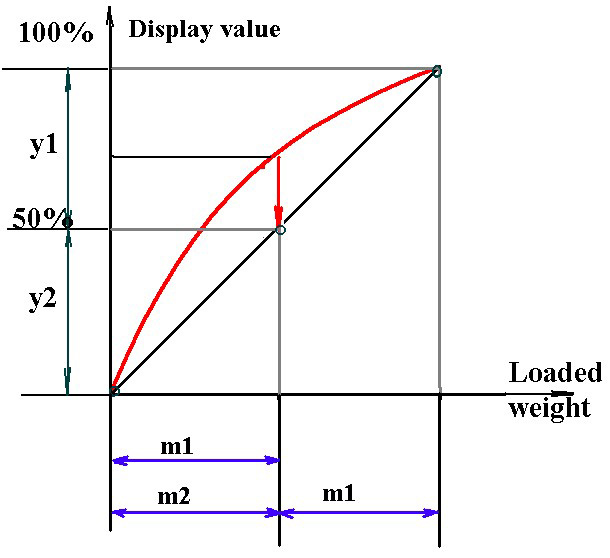
At present, the AutoCalTM fully automatic calibration system is widely used in the huge Ohaus balance family. In particular, the Explorer® quasi-microbalance uses two built-in weights with range calibration and linear calibration. During the calibration process, the linearity of the balance can be tested and automatically linearly calibrated by simultaneously loading the weights m 1 and m 2 and loading the weights m 1 and m 2 respectively to calibrate the half-load points.
In addition, the Explorer® series of analytical and precision balances of less than one in 100, and the AutoCalTM of the AdventurerTM AX series of balances are equipped with a built-in weight for range calibration, allowing users to make flexible choices based on specific usage requirements. !
After listening to Xiaobian's comprehensive and meticulous explanation, did you touch the calibration doorway? Do you want to feel the power of AutoCalTM technology right away? If you have more difficult questions about balance calibration, or are looking for more professional and detailed selection guide, please call 4008-217-188, or click to enter "Request Information" and leave relevant information, our professional engineers Will contact you in the first time! Finally, Xiao Bian once again wishes everyone a happy and auspicious life in the Year of the Want Want, and the work is smooth and smooth!
Fingerprint Lock Safe Box,Hotel Fingerprint Laptop Safe,Hotel Fingerprint Safe Box,Closet Safe Box
Hebei Yingbo Safe Boxes Co.,Ltd , https://www.ybsafebox.com